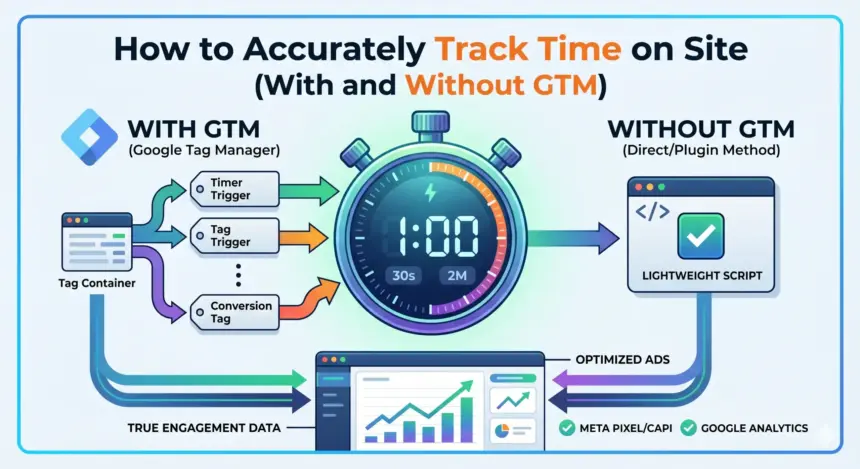
Standard pageviews are a vanity metric, especially when running paid traffic. If a user clicks an ad, loads your page, and bounces three seconds later, standard analytics still records a “PageView.” To train ad platform algorithms effectively and evaluate true content quality, you need to know exactly who is actually reading.
Standard tools often miscalculate engagement time for single-page sessions. To optimize ad spend and scale campaigns, you need precise time-on-site triggers. Here is how to deploy reliable time-on-site tracking—starting with streamlined, script-light methods, followed by Tag Manager alternatives.
Table of Contents
- Part 1: Tracking Time on Site Without GTM (Direct & High-Performance)
- Option A: The Easy Way — 1-Click Setup via ROAS Tool Kit
- Option B: The Manual JavaScript Method (setTimeout)
- Option C: The Active Visibility API (Advanced Manual)
- Part 2: The GTM Method (The Tag Manager Alternative)
- Step 1: Building the Timer Trigger
- Step 2: Connecting the Tag
- Part 3: Turning Engagement Signals into Profit
- 1. Advanced Retargeting & Lookalike Audiences
- 2. Algorithmic Optimization
- 3. Content Auditing
- Conclusion
- Frequently Asked Questions (FAQ)
Part 1: Tracking Time on Site Without GTM (Direct & High-Performance)
Bypassing Google Tag Manager reduces third-party script bloat, improves core web vitals, and helps maintain tracking accuracy against aggressive ad blockers. By hardcoding your tracking or using a dedicated performance plugin, you keep data processing fast and direct.
Option A: The Easy Way — 1-Click Setup via ROAS Tool Kit
Manual coding isn’t necessary if you are running a WordPress stack optimized for traffic arbitrage. Using a performance-focused plugin like the ROAS Tool Kit allows you to deploy advanced tracking without touching your theme files.
How it works in a few clicks:
- Open the ROAS Tool Kit dashboard in your WordPress admin.
- Toggle on the Time-on-Site Event feature.
- Define your target engagement thresholds (e.g., 30 seconds, 1 minute, 2 minutes).
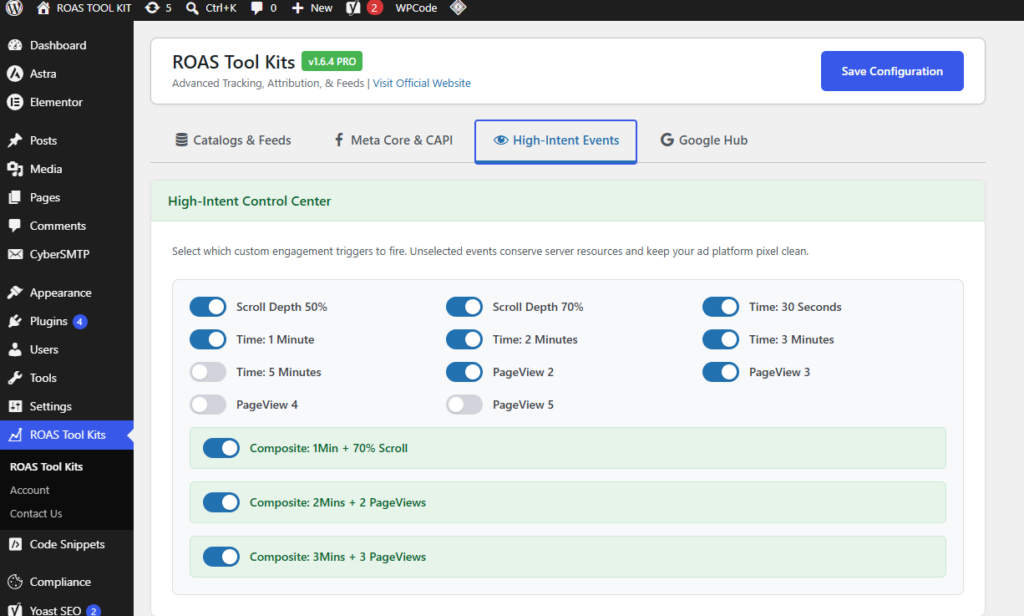
The plugin instantly injects clean, lightweight tracking scripts sitewide. What makes this approach powerful is that it automatically routes this time data to both Meta and Google Analytics simultaneously. It hooks these timed milestones directly into your pixels and server-side Conversions API (CAPI) infrastructure, ensuring deduplicated, highly accurate event firing without the overhead of a GTM container.
Option B: The Manual JavaScript Method (setTimeout)
If you want to hardcode the solution yourself, the most basic method relies on a standard JavaScript function that initializes when the Document Object Model (DOM) loads.
Using setTimeout(), you tell the browser to wait for a specific milestone—like 30,000 milliseconds—before firing a custom script or API ping.
JavaScript
// Example: Firing an event after 30 seconds
setTimeout(function() {
    // Insert your dataLayer push or pixel firing code here
    window.dataLayer = window.dataLayer || [];
    window.dataLayer.push({
        'event': 'time_on_site_30s'
    });
}, 30000);
The Core Flaw: Manual setTimeout functions are “dumb” timers. They keep running even if a user minimizes the browser window or switches to another tab. This can lead to inflated engagement data, recording a 2-minute session for a user who wasn’t actually looking at the page.
Option C: The Active Visibility API (Advanced Manual)
To solve the background-tab issue and track true engagement, you must utilize the browser’s document.visibilityState to build an active timer.
This method pauses the timer the exact moment a user hides the tab or minimizes the screen, and resumes only when the page becomes visible again.
JavaScript
let totalTimeVisible = 0;
let isVisible = document.visibilityState === 'visible';
let timerInterval;

function startTimer() {
    timerInterval = setInterval(() => {
        totalTimeVisible += 1;

        // Fire milestones
        if (totalTimeVisible === 30) fireEvent('30_seconds');
        if (totalTimeVisible === 60) fireEvent('1_minute');
        if (totalTimeVisible === 120) fireEvent('2_minutes');

    }, 1000);
}

document.addEventListener("visibilitychange", () => {
    if (document.visibilityState === 'visible') {
        startTimer();
    } else {
        clearInterval(timerInterval);
    }
});

// Initialize on load
if (isVisible) startTimer();
This ensures that when your system registers a 1-minute reader, that user spent 60 cumulative seconds with your content actively rendered on their screen.
Part 2: The GTM Method (The Tag Manager Alternative)
GTM is best for non-WordPress environments, or when you need to rapidly map events across multiple disparate ad platforms without backend access.
Step 1: Building the Timer Trigger
Instead of custom code, GTM has a native Timer trigger.
- Navigate to Triggers > New > Timer.
- Set the Interval in milliseconds. For a 30-second trigger, enter 30000 . (Create separate triggers for 60000 and 120000 if you want 1-minute and 2-minute buckets).
- Set the Limit to 1 so the trigger only fires once per session.
- Set the condition to enable the trigger (e.g., Page URL matches RegEx .* to fire sitewide).
Step 2: Connecting the Tag
Create your specific pixel or GA4 Event tags and set your newly created Timer Triggers as the firing rule. Name your events clearly (e.g., engaged_30s, engaged_1m ) so they are easy to identify in your analytics dashboards.
Downsides to Consider: GTM adds an extra layer of script execution. On mobile-heavy traffic sources, this can impact Core Web Vitals and slightly delay the firing of the event if the browser is busy executing other tags.
Part 3: Turning Engagement Signals into Profit
Collecting the data is only step one; the true competitive advantage lies in how you leverage these signals within your advertising dashboards.
1. Advanced Retargeting & Lookalike Audiences
Because tools like the ROAS Toolkit stream this precise engagement data straight to both Meta and Google Analytics, you can build identical, high-intent audiences across both major ad ecosystems:
- Meta Ads: Create Custom Audiences based on the specific tracking events (e.g., people who hit the 1-minute or 2-minute mark). From there, you can build hyper-focused Lookalike Audiences (LLAs) to command Meta’s algorithm to find users who share behavioral traits with your deepest readers.
- Google Ads: By importing these precise time-spent events into Google Analytics (GA4), you can spin up custom audience segments. These segments sync directly into Google Ads, allowing you to run aggressive Search, Performance Max, or YouTube retargeting campaigns targeting only the users who proved they have real interest.
2. Algorithmic Optimization
Instead of optimizing your campaigns for standard pageviews, optimize for the 30-second or 1-minute event. Passing these precise time-triggered events back via CAPI actively trains the advertising algorithms to hunt for users who actually consume content, drastically improving traffic quality and lowering your overall cost per acquisition.
3. Content Auditing
If a specific landing page has a high click-through rate (CTR) but struggles to generate 30-second events, you have an immediate diagnostic signal. You can quickly pinpoint structural issues, slow load times, or a mismatch between ad creative and page content.
Conclusion
While GTM offers a standard fallback for multi-platform management, running tracking directly through a performance-first setup like the ROAS Toolkit or custom active JavaScript ensures faster page speeds, bypasses container bloat, and delivers cleaner data.
Pick your highest-traffic landing page, activate your 30-second, 1-minute, and 2-minute milestones today, and stop optimizing your ad budget around empty clicks.
Frequently Asked Questions (FAQ)
Why shouldn’t I just rely on Google Analytics’ default “Time on Page”? Standard analytics platforms calculate time on page by measuring the timestamps between two pageviews. If a user clicks your ad, reads your article for four minutes, and then closes the tab without clicking to a second page, standard analytics records their time on site as 0 seconds (a bounce). Active time-tracking scripts explicitly send signals while the user is reading, fixing this data gap.
How does the ROAS Toolkit differ from using Google Tag Manager (GTM) for timers? GTM requires loading an entire container script, building manual triggers, and mapping individual tags for every ad network. The ROAS Toolkit is a lightweight WordPress plugin that instantly injects optimized active-visibility timers. It bypasses the GTM container completely and automatically routes your 30-second, 1-minute, and 2-minute milestones directly to both Meta and GA4 via server-side connections.
Does the standard JavaScript setTimeout method track true engagement? No. A basic setTimeout function will continue running even if the user switches tabs, minimizes the browser, or walks away from their computer. To track actual screen time, you must use the browser’s Active Visibility API, which pauses the timer when the tab is no longer in view.
Can I use time-on-site data to lower my ad costs? Yes. If you are running paid traffic, feeding standard pageviews back to the ad network often trains the algorithm to find “clickers” rather than readers. By optimizing your campaigns around a specific time milestone (e.g., triggering a conversion only when a user hits 60 seconds), you train the algorithm to find high-intent users, vastly improving the quality of your traffic and your overall return on ad spend.
Will adding time-tracking scripts slow down my site? It depends on how you implement them. Loading multiple third-party tracking scripts or a heavy GTM container can impact Core Web Vitals. However, using a direct active visibility script or a performance-optimized solution like the ROAS Toolkit has a negligible footprint and will not negatively impact your page speed.