If your conversion data is losing accuracy due to ad blockers, strict browser tracking protections, or iOS privacy updates, relying solely on traditional browser-based tracking is no longer enough. To capture every interaction accurately, upgrading your infrastructure to server-side routing via the Google Analytics 4 (GA4) Measurement Protocol is essential.
By implementing a direct server-to-API connection, you can bypass browser-level restrictions and send unblockable event data directly to your GA4 property. Best of all, by using a host-native architecture like the ROAS Tool Kit, you can establish this elite tracking setup natively within WordPress—completely eliminating the need for expensive monthly third-party cloud tagging servers.
This step-by-step guide will show you exactly how to generate your GA4 API Secret and configure it for seamless server-side routing.
Table of Contents
- Step 1: Locate Your GA4 Data Stream
- Step 2: Generate the Measurement Protocol API Secret
- Step 3: Configure the Secret in WordPress
- How to Verify Your Setup
- Method 1: The GA4 Realtime Report (Quickest)
- Method 2: GA4 DebugView (Most Detailed)
- Method 3: Google Analytics Event Builder (For Troubleshooting)
- The Proof of Perfect Attribution
- Troubleshooting Common Server-Side Payload Errors
Step 1: Locate Your GA4 Data Stream
Before you can generate an API Secret, you need to access the specific web data stream that collects traffic for your website.
- Log in to your Google Analytics Dashboard.
- Click the Admin gear icon located in the bottom-left corner of the screen.
- Under Data collection and modification, select Data Streams.
- Click on your active Web Data Stream to open its detailed settings panel.
Step 2: Generate the Measurement Protocol API Secret
The API Secret acts as a secure password that authenticates your requests and authorizes your server to send event data directly to your Google Analytics property.
- Inside your Web stream details panel, scroll down to the Events section and click on Measurement Protocol API secrets.
- Note: If this is the first time you are accessing this feature for your property, you may see a prompt asking you to review and accept the Measurement Protocol data collection terms. Click Review terms and accept them to proceed.
- Click the Create button.
- In the Nickname field, enter a clear, recognizable name (for example:
ROAS Tool Kit Server-Side). - Click Create to generate the credential.
- Locate your new secret under the list and click the copy icon next to the Secret value string. Keep this value strictly confidential.
Step 3: Configure the Secret in WordPress
With your API Secret safely copied, the final step is to hook it up to your server-side routing engine to start sending clean data.
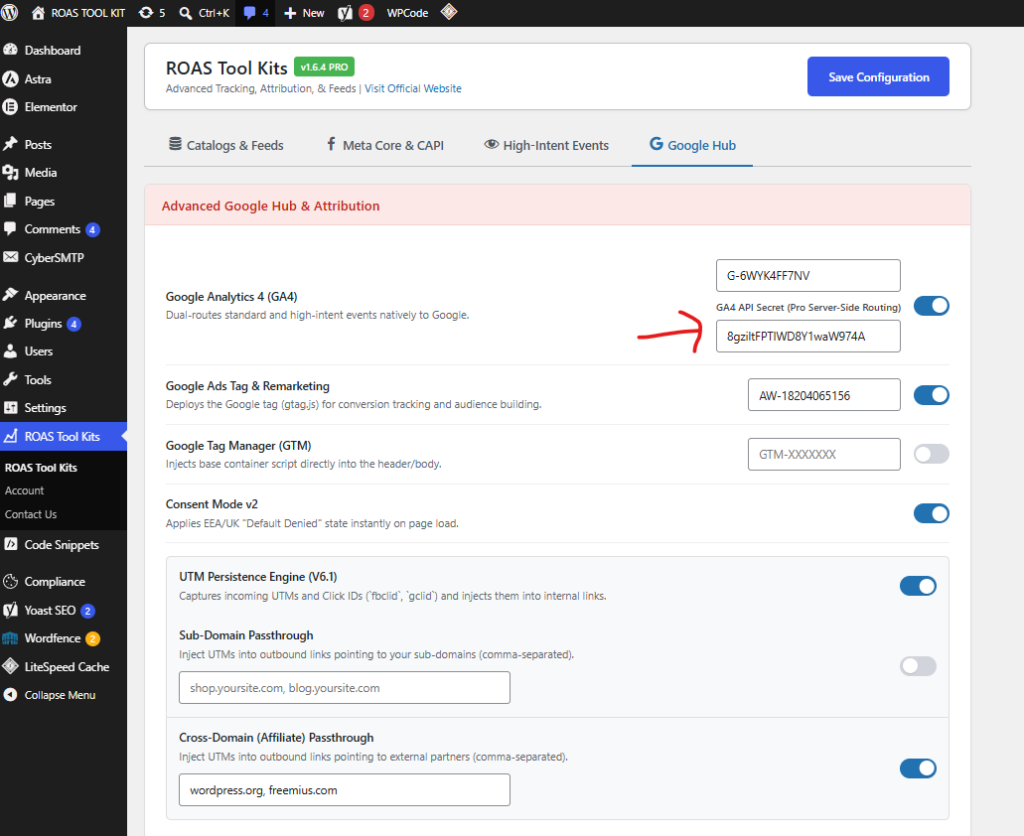
- Open your WordPress dashboard and navigate to the ROAS Tool Kit settings.
- Click on the Google Hub or GA4 Settings tab.
- Locate the field labeled GA4 API Secret (Pro).
- Paste the secret value string you copied from Google Analytics into the field.
- Double-check that your standard GA4 Measurement ID (e.g.,
G-XXXXXXXXXX) is also properly filled out in the field right above or next to it. - Scroll down and click Save Configuration.
How to Verify Your Setup
Once you have configured the API Secret on your server, you need to ensure the data is actually flowing into Google Analytics. Because server-side events bypass the browser entirely, you won’t be able to use standard browser extensions like the Google Tag Assistant to track them.
Instead, use these three methods to confirm your setup is working perfectly.
Method 1: The GA4 Realtime Report (Quickest)
The simplest way to check if your connection is live is to trigger an action on your site and watch the live data feed inside GA4.
- Open your website in an incognito window and trigger some test actions (e.g., scroll down a long page or stay on a page for a few minutes).
- Head back to Google Analytics and navigate to Reports > Realtime in the left navigation menu.
- Scroll down until you see the “Event count by Event name” card.
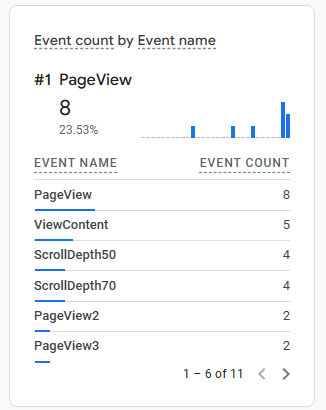
As shown in the image, your high-intent, custom server-side events like ScrollDepth50, ScrollDepth70, TimeOnSite3Min, and TimeOnSite5Min will begin populating this list in real-time.
Method 2: GA4 DebugView (Most Detailed)
If you want to inspect the exact payload (like checking if specific parameters are passing correctly), DebugView is the best tool available.
- Enable Debug Mode: To make server-side events appear in DebugView, your server payload must include a debug flag parameter. Note: If you are using the ROAS Tool Kit, this option can be easily toggled inside your plugin settings.
- Access DebugView: In your GA4 dashboard, click Admin (the gear icon), look under Data Display, and click DebugView.
- Inspect the Data: As you interact with your site, live events will populate in the vertical timeline. Click on any specific event to expand its parameters and verify that the data structure is completely intact.
Method 3: Google Analytics Event Builder (For Troubleshooting)
If your events are not showing up in Realtime or DebugView, you may have a formatting error in your payload. Because Google Analytics intentionally drops malformed Measurement Protocol data silently without returning HTTP error codes, troubleshooting requires a validation tool.
- Navigate to the official online Google Analytics Event Builder.
- Enter your Measurement ID and the API Secret you generated earlier.
- Construct your test event payload and click Validate Event.
- The tool will run the payload against GA4’s validation server and pinpoint the exact syntax or structural field causing the issue. (Note: Events sent to the validation server are strictly for testing and will not affect your live GA4 reporting).
The Proof of Perfect Attribution
To truly confirm that your tracking setup is flawless, you must check your session stitching in the Realtime report.
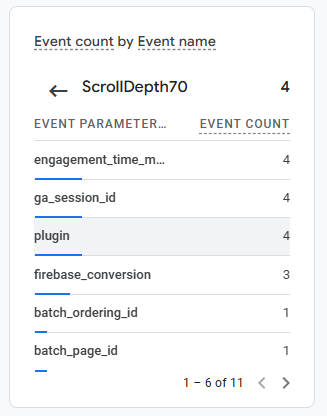
Referencing above Image, if you drill down into the ga_session_id parameter within the Realtime report, you can confirm that your Measurement Protocol events are successfully carrying the session data. Here is why seeing this is so important:
- Session Stitching is Active: Those 10-digit numbers you see (like
1780959644and1780961656) are raw Unix timestamps representing the exact moment a user started their session. - No More “(not set)” Errors: Because your server-side events are successfully passing this
ga_session_idalong with theclient_id, Google Analytics knows exactly which browser session triggered the event. This prevents your server events from being orphaned or showing up as “(not set)” in your traffic acquisition reports. - Unified Customer Journey: Whether a user triggers a standard
page_viewfrom their browser or a customScrollDepth70event from your server, GA4 will now bundle them seamlessly under the exact same user journey.
Troubleshooting Common Server-Side Payload Errors
If you’ve verified your connection but your server-side events are still failing to link back to your traffic sources, you likely have a formatting issue in your event payload.
When sending data via the GA4 Measurement Protocol, Google Analytics requires specific identifiers to stitch your server events together with the user’s browser session. If these are missing, your data will be orphaned.
Here are the most common payload errors and how to fix them:
- Missing or Invalid Client ID (
client_id):- The Client ID is absolutely required for every Measurement Protocol request associated with web streams.
- This identifier is how GA4 knows who triggered the event.
- You can extract this value directly from the standard
_gacookie located on your root domain.
- Missing Session ID (
session_id):- GA4 requires you to explicitly declare the Session ID if you want your server events to attribute correctly to standard reports like Realtime.
- The
session_idmust be passed specifically inside the event parameters of your payload. - You can find the active Session ID inside the
_ga_<measurement_id>cookie. Look for the section of the cookie string that begins with an “s” followed by a timestamp (e.g.,s1746773758)—stripping the “s” will give you the raw session timestamp you need to pass.
- Incorrect Measurement ID or API Secret:
- Ensure your payload includes the exact API Secret you generated.
- Double-check that the Measurement ID attached to the request matches the exact stream where the secret was created.
Pro Tip: If you are using the ROAS Tool Kit, the plugin automatically captures and passes both the
client_idand thesession_idfrom the browser to the server for you, eliminating the need to write custom extraction scripts.