For media buyers, affiliate marketers, and traffic arbitrageurs running high-volume paid traffic on Meta, TikTok, or Google Ads, tracking precision is the boundary line between a highly profitable campaign and a burning ad budget.
When a user clicks an ad, they arrive at your landing page, advertorial, or pre-sell hub with a URL heavily loaded with critical tracking data: standard UTM parameters (utm_source, utm_campaign, utm_medium) alongside crucial ad network click identifiers like Meta’s fbclid, TikTok’s ttclid, or Google’s gclid.
However, the moment that user clicks an outbound call-to-action (CTA) button to jump to your final offer page, a different subdomain, or an external affiliate network, those tracking strings are instantly stripped away. The destination platform records this premium paid user as generic “direct” or “referral” traffic. Your server-side Conversions API (CAPI) loses its match keys, your attribution models break down, and the ad platform algorithm begins optimizing blindly.
To fix this leaky pipeline, you must ensure total parameter persistence across every single page hop, domain boundary, and subdomain transition.
Table of Contents
- Streamlining Attribution with the ROAS Toolkit
- Automated Server-Side Pass-Through
- Simultaneous Native Data Routing
- Why Standard Tracking Fails Across Pages, Domains, and Subdomains
- Method 1: The Manual JavaScript & Local Storage Stack (For Developers)
- Step 1: Parameter Capture Script
- Step 2: Dynamic Link Rewriting Script
- Maintenance Disadvantages of the Manual Approach
- Method 2: Deploying Parameter Pass-Through via ROAS Toolkit
- Turning Preserved UTM Data into Scalable Ad Profit
- 1. Elevating Meta and TikTok CAPI Match Rates
- 2. Amplifying the Algorithmic Optimization Feedback Loop
- Frequently Asked Questions
Streamlining Attribution with the ROAS Toolkit
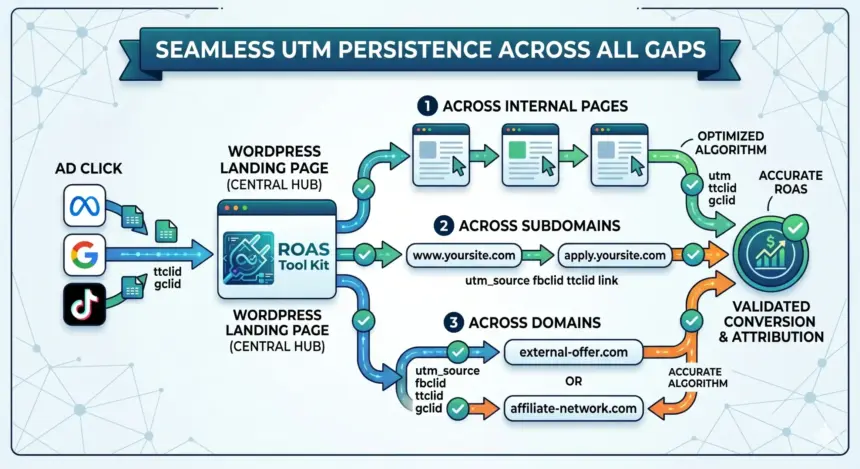
Before diving into the complex manual code required to pass URL data across isolated web properties, it is essential to understand how modern performance tracking architectures solve this problem seamlessly. The most efficient way to maintain tracking continuity in a WordPress environment is through a dedicated server-side routing engine like the ROAS Toolkit plugin.
Incoming Ad Click (?utm_source=meta&fbclid=123)
       │
       ▼
┌──────────────────────────────────────────────┐
│             WordPress Landing Page           │
│  (ROAS Toolkit captures & stores data)        │
└──────────────────────────────────────────────┘
       │
       ├───────────────────────────────────────┐
       ▼                                       ▼
┌──────────────────────────────┐       ┌──────────────────────────────┐
│  Outbound Link: Subdomain    │       │  Outbound Link: Cross-Domain │
│  (apply.yoursite.com/?fbclid)│       │  (externaloffer.com/?fbclid) │
└──────────────────────────────┘       └──────────────────────────────┘
Automated Server-Side Pass-Through
Unlike unstable client-side tracking scripts that run entirely in the user’s browser, the ROAS Toolkit handles parameter management directly within the WordPress stack. When a visitor lands on your site via a paid ad, the plugin immediately intercepts the incoming query strings. It extracts the raw UTM fields and click IDs and registers them safely on the backend.
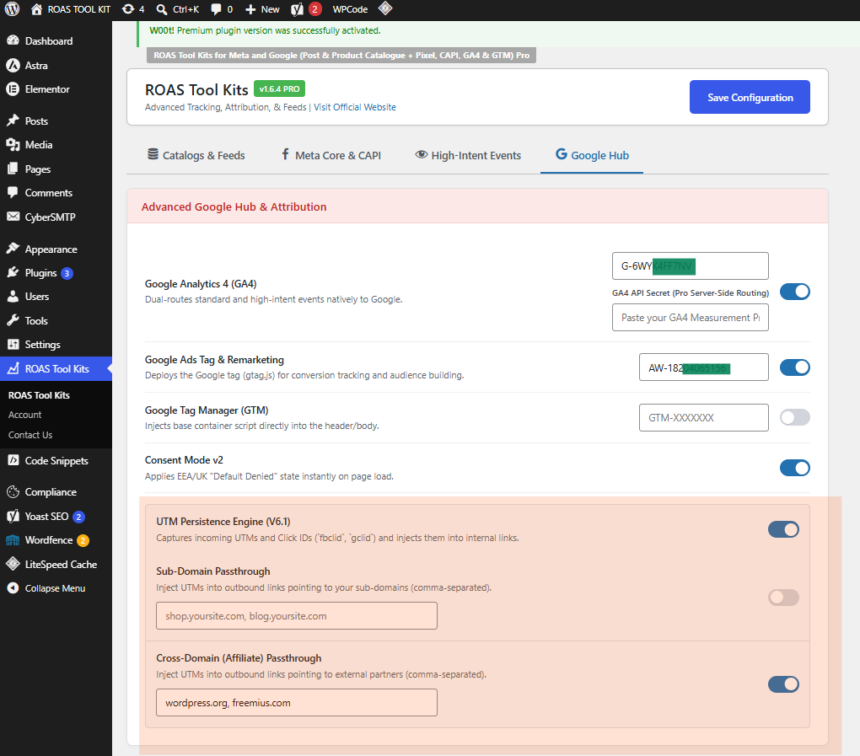
Instead of forcing you to manually rewrite every link or append variables to every button, the engine automatically hooks into the WordPress output buffer. It dynamically scans the page for outbound hyperlinks, checking them against your routing rules. When a user clicks a link targeting an external domain or a secure subdomain, the plugin automatically appends the exact tracking payload to that link string in real-time.
Simultaneous Native Data Routing
Beyond link modification, the core function of the ROAS Toolkit is its ability to act as a central dispatcher for data normalization. It processes the traffic parameters and streams them simultaneously to both Meta (via pixel and server-side Conversions API) and Google Analytics (GA4).
By unifying this data, it ensures that your internal performance dashboards match the optimization data inside your ad accounts. This multi-channel event routing provides the exact foundational data required to build hyper-targeted lookalike audiences and run precision retargeting campaigns on Google and Meta simultaneously, without having to configure separate tracking tags for each individual network.
Why Standard Tracking Fails Across Pages, Domains, and Subdomains
To understand why a dedicated pass-through system or manual script is mandatory, you have to look at the underlying security mechanics of modern web browsers. Traditional session tracking heavily relies on web cookies or browser storage objects, both of which are blocked by hard infrastructure boundaries:
- The Same-Origin Policy: Browsers employ strict security walls that isolate data by domain. A cookie or local storage string set on yoursite.com is completely invisible to external-affiliate-network.com. If your final offer sits on a vendor’s domain, that vendor cannot read your landing page cookies.
- Subdomain Isolation: While subdomains share a root domain, storage mechanisms like sessionStorage or localStorage are restricted to the exact origin by default. A script running on blog.yoursite.com cannot natively extract data stored inside the local storage container of checkout.yoursite.com.
- Intelligent Tracking Prevention (ITP): Apple’s Safari, Brave, and other privacy-first browsers place aggressive expiration limits on first-party JavaScript cookies—often deleting them within 1 to 7 days, or immediately if the user switches apps.
Because storage states are fragile and isolated, the only bulletproof vehicle for carrying attribution data across boundaries is the URL string itself. The tracking payload must travel inside the link parameters as the user navigates from property to property.
Method 1: The Manual JavaScript & Local Storage Stack (For Developers)
If you are comfortable maintaining custom code structures inside your WordPress ecosystem and wish to build a client-side alternative, you can implement a manual two-part script using vanilla JavaScript.
This approach captures the parameters on entry, preserves them within the browser’s temporary session storage to handle internal page multi-navigation, and dynamically rewrites outbound anchors right before execution.
Step 1: Parameter Capture Script
Place this script in your WordPress site’s header (header.php) or inject it via an action hook. It reads the current URL parameters upon DOM initialization and caches them safely inside sessionStorage.
JavaScript
<script>
document.addEventListener("DOMContentLoaded", function() {
    // Parse the current URL query parameters
    const urlParams = new URLSearchParams(window.location.search);

    // Explicitly define the tracking parameters to preserve
    const targetParams = [
        'utm_source',
        'utm_medium',
        'utm_campaign',
        'utm_term',
        'utm_content',
        'fbclid',
        'ttclid',
        'gclid'
    ];

    // Store found parameters in sessionStorage to maintain state across internal pages
    targetParams.forEach(param => {
        if (urlParams.has(param)) {
            sessionStorage.setItem(param, urlParams.get(param));
        }
    });
});
</script>
Step 2: Dynamic Link Rewriting Script
This second component loops through the hyperlinks on your page. When a user clicks a button designated for your external offer or specialized subdomain, the script stops the default navigation for a millisecond, merges the saved parameters into the link’s URL object, and then redirects the browser.
JavaScript
<script>
document.addEventListener("DOMContentLoaded", function() {
    // Select all outbound anchors pointing to your final offers or subdomains
    // Pro-Tip: Add a class like 'offer-link' to your CTA buttons in Gutenberg/Elementor
    const checkoutLinks = document.querySelectorAll('a.offer-link');

    checkoutLinks.forEach(link => {
        link.addEventListener('click', function(e) {
            e.preventDefault(); // Temporarily halt navigation

            try {
                let currentDestination = new URL(this.href);

                // Iterate through browser session storage
                for (let i = 0; i < sessionStorage.length; i++) {
                    let storageKey = sessionStorage.key(i);
                    let storageValue = sessionStorage.getItem(storageKey);

                    // Verify if the storage key matches our allowed tracking array
                    if (['utm_source', 'utm_medium', 'utm_campaign', 'utm_term', 'utm_content', 'fbclid', 'ttclid', 'gclid'].includes(storageKey)) {
                        currentDestination.searchParams.set(storageKey, storageValue);
                    }
                }

                // Resume navigation to the newly constructed query-rich URL
                window.location.href = currentDestination.toString();
            } catch (error) {
                // Fallback: If URL construction fails, proceed with the original link
                window.location.href = this.href;
            }
        });
    });
});
</script>
Maintenance Disadvantages of the Manual Approach
While functional, manual JavaScript architecture has distinct scaling limitations for active media buyers:
- Gutenberg & Builder Breakage: If an editor forgets to add the specific .offer-link class to a new button inside Elementor, Divi, or the WordPress block editor, tracking immediately drops for that link.
- Caching Conflicts: Heavy optimization plugins (like WP Rocket or LiteSpeed Cache) frequently defer, minify, or aggregate inline JavaScript. If your script execution is delayed until after a fast user clicks the CTA, the parameters will fail to attach.
Method 2: Deploying Parameter Pass-Through via ROAS Toolkit
For performance teams running automated traffic funnels across multiple landers, listicles, or advertorial variations, manual script deployment introduces too many points of failure. The automated alternative relies on simple, 1-click administrative configuration.
┌────────────────────────────────────────────────────────┐
│               ROAS TOOLKIT DASHBOARD                   │
├────────────────────────────────────────────────────────┤
│ [ ON ] UTM Persistence & Parameter Pass-Through        │
│                                                        │
│ Target Domains:                                        │
│ [ apply.yoursite.com, externaloffer.com              ] │
└────────────────────────────────────────────────────────┘
To activate this configuration using the plugin:
- Log into your WordPress admin dashboard and navigate to the ROAS Toolkit control center.
- Locate the tracking engine submenu and toggle the UTM Persistence / Parameter Pass-Through module to active.
- In the target routing fields, define your network properties. You can input specific target subdomains (e.g., apply.yourbrand.com), distinct cross-domains (e.g., network-offer-vault.com), or configure the plugin globally to append incoming tracking parameters to every outbound external hyperlink automatically.
The underlying engine handles the background operations dynamically. It ensures that regardless of browser types, cookie restrictions, or local caching mechanisms, incoming click IDs and campaign metrics seamlessly pass straight through to the final tracking destination.
Turning Preserved UTM Data into Scalable Ad Profit
Fixing cross-domain parameter drops provides distinct structural advantages directly inside your primary ad accounts:
1. Elevating Meta and TikTok CAPI Match Rates
When your server-side conversion signals are dispatched back to ad networks via API endpoints, the platforms look for matching customer keys to attribute the event correctly. A raw conversion event without user data has low matching priority.
However, when you pass the native click string (fbclid or ttclid) flawlessly across your subdomains or affiliate links to the final conversion page, the conversion signal includes the exact cryptographic click fingerprint assigned by the ad network. This raises your event match quality score, forcing the ad networks to credit your campaigns with 100% accurate conversion attribution.
2. Amplifying the Algorithmic Optimization Feedback Loop
Ad platform machine learning modules do not optimize around clicks; they optimize around the data footprints of completed conversions. If your tracking drops parameters across your domain hops, you cannot feed conversion data cleanly back to your pixel.
By maintaining parameter persistence across every stage of the user journey, you ensure that every high-value conversion tracks perfectly back to the exact ad creative and campaign that initiated the user session. This constant data loop trains the platform’s algorithm to hunt exclusively for users who read content and finish the funnel, consistently lowering your overall cost-per-acquisition (CPA).
Frequently Asked Questions
Can I pass parameters across domains if I don’t own the destination site?
Yes. As long as you can append the data to the outbound link string, the destination site will receive the query parameters. Ensure that your affiliate manager or destination platform supports parsing standard UTM parameters and network click IDs so that they can register the values upon user arrival.
What is the difference between cross-domain and subdomain tracking?
Cross-domain tracking involves shifting a user between entirely different root domain names (e.g., siteA.com to siteB.com), which are completely isolated by browser cookie permissions. Subdomain tracking involves moving a user between prefixes on the same structural root domain (e.g., news.site.com to portal.site.com). While less restricted than root cross-domains, subdomains still isolate local storage data, requiring url parameter pass-through for reliable persistence.
Does URL parameter passing conflict with WordPress page caching?
Manual JavaScript tracking implementations often experience errors or delays when combined with aggressive page caching and JS optimization layers. Because the ROAS Toolkit operates natively within the rendering buffer and optimizes script execution, it maintains seamless parameter pass-through functionality without interfering with your server caching policies or speed scores.
Passing UTMs across different domains seems tricky. Do you think it’s better to use plugins or go with custom code for this?
custom code would be good if you are good at coding. Unless i would go for plugin